Kyruus Guide
Download the Kyruus Extension (only need to do once)
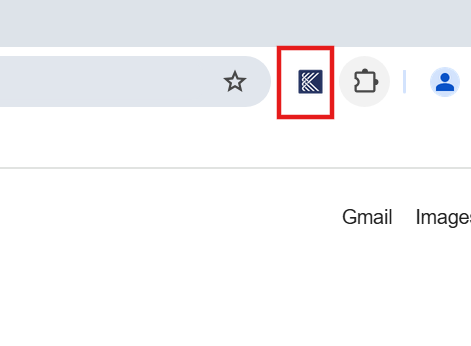
1) In the upper righthand corner of your
browser, click the puzzle piece icon.
2) In the dropdown menu, select the Pin
icon next to Kyruus Insurance Inbox. If you do not have the Kyruus Insurance
Inbox in this list, see Troubleshooting Steps 1-4 at the bottom of this page.
3) When complete,
you will see a blue pin instead of an empty pin shape and there will be a capital “K” icon in the corner of your browser. To launch the Kyruus sidebar, click
the “K” icon in the top right corner of your browser toolbar.
Troubleshooting Steps:
1) Press the Windows key and “i” at the same time. This
will open settings.
2) Click on Accounts, then click "Access Work or
School".
3) In that window, click on your Geode account, then click the Info
button that appears.
4)
Scroll down in the new
window and click Sync. When the sync finishes, about 30 seconds, look
again to see if you have it.
Set Default Browser to be Google Chrome (Chrome required for Kyruus extension - only need to do once)
1) Open up System settings by pressing Windows key+I, and then click on “Apps.”

2) From the pane on the left side, click “Default Apps.”
3) Locate the Web Browser section, click on your current default browser, and then scroll through the list and select “Google Chrome.”
4) Close Settings, and that’s it. Chrome is now your default web browser.
Logging into Kyruus
If you plan to use the Kyruus extension tools, you must re-initiate in Kyruus each morning prior to using it. If you change login departments, you will need to reinitiate in the new department.
1) To initiate, click on Apps> Kyruus
2) A new tab will open with the message “Login Successful”. Your initiation is complete and you can close the tab and return to Athena. If you are ever having issues with the extension, try re-initiating, as this may solve it.
While in Athena, click the "K" icon in your Chrome toolbar to launch the Kyruus Sidebar. Click on the hamburger menu (the
three green lines) in the right-hand corner of the inbox to view your activity options.
Insurance
Inbox
This option contains
the Patient Appointment list. The list displays the patient’s name and ID given
by the practice in chronological order. When you click the patient’s name, you
can access their awaiting insurance information and follow the steps of
reviewing insurance card images.
● Click the patient ID to
review the insurance images
○
Patients
listed in RED have
an appointment today
○
Patients
listed in ORANGE
have an appointment tomorrow
○
Patients
listed in GREY
have an appointment two days from now
1) Clicking on the patient
ID from the patient appointment will bring you to their Quickview in
Athena AND bring you to their insurance images on the right.
2) If you need to
adjust the image, you can use the two squares with arrows to turn the
image until it is corrected. To zoom in, double click on the image and
click and grab to move around the screen. Double click again to zoom out.
3) “SAVE CARD”
uploads the card image to the insurance package that is indicated by the
“Primary” or “Secondary” radio buttons. “NEXT PATIENT” will bring you to
the next patient no the list, skipping over the current patient WITHOUT
saving.
4) When finished, you
should see “update/delete card image” next to insurance card image,
helping signify the card has been uploaded.
***If a patient
uploaded two different cards, use the “1” and “2” to toggle between card
images.
Follow the same
steps for the primary insurance, making sure the “Secondary” button is
clicked instead of “Primary” for the radio buttons above “SAVE CARD”
Patient
This option contains
the option to edit today’s co-pay, send a PreVisit Link
Message
On this page you can send the patient a custom message
To send a patient text:
1) Select the patient
that you would like to receive the text. You must be on the correct page
in Athena to load the Patient tab: either the Appointment
Quickview page, the Start Check-in page, or in the Chart (for providers).
2) Once you are in the Appointment Quickview of Start Check-in page, you can select the “Message” tab from the hamburger
menu in Kyruus.
3) Fill in the text you want to send in the "Sent Patient Text" field and click send. It will send to the patient instantaneously. The patient is not able to respond to these texts.
This option allows you
to select one or multiple forms to send to your patient. You are also able to confirm and change the patient's cell number that the form is going to.
1) Access the patient you want to send forms to. Launch the Kyruus sidebar.
2) Click the green hamburger menu and select the "Send Patient Forms" option.
3) Click on the “Send
Forms” dropdown and select forms from the available list
- Multiple forms
may be selected (up to 6)
- If you
accidentally select the wrong one, click the gray X in the corner of the
form to delete it from the selection box.
4) Update the cell phone number to send to, as needed in the "Confirm Patient Cell Number" field. You can enter any cell phone number here.
5) Click the "Send Patient Forms" button to send and you will get a confirmation message that they have been sent.
6) When the patient signs the forms, they will automatically flow back into Athena.
Payment Requests (Copay or Outstanding Balance)
1) Access the patient you want to send a payment request to. Launch the Kyruus sidebar.
2) Click the green hamburger menu and select the "Payment Requests" option.
Copay:
3) Select "Co-pay or Self-pay request" and enter the amount you'd like to collect in the "Co-pay or Self-Pay Amount" field. This will be the amount the patient is asked to pay when they receive the link.
4) Select "Send Request" and a payment link will be sent via text to the mobile phone and email address listed for the patient.
Existing Outstanding Balance:
Balances owed by patients for previous visits will appear here.
5) Select the balance(s) you would like to send to the patient.
6) Select "Send Request" and a payment link will be sent via text to the mobile phone and email address listed for the patient.
Settings
Under this option,
there will be two radio buttons. Select "Athena Department Chosen at Login” so that you only see insurance cards for your department. If needed, use the option for “All Athena Departments” to show all cards will show for all
practices.
Kyruus Patient Notifications
Patients receive notifications up to 2 times from Kyruus:
- First
notification: 7 days prior to the visit, they receive a text and email
- Second
notification: if they have not completed the self-check in process by the day
before the visit, Kyruus will send a second text and email the day before the
visit
If the patient still has not completed self-check in by the
time you are checking them in, you will re-push the check-in process to them
manually for them to complete at that time.
Overview of All Geode Patient Communications
|
When
|
At Time of Booking
|
5 Days before Appt
|
Day Before Appt
|
Day of Appt
|
Immediately After Appt
|
|
Comm Method
|
Confirmation email (if telehealth
visit, email contains Doxy link)
|
Kyruus self-check in email and text
|
Kyruus self-check in email and text
(if not completed yet)
|
If telehealth, Doxy link sent 15
minutes before visit via email and text
|
Feedback survey and request for
online review (sent after appt and repeats every 90 days)
|
How to Turn Off Patient Notifications (if requested by patient)
Kyruus Texts:
1) Ask the patient to reply "STOP" to the Kyruus message. This will stop all future Kyruus texts.
Kyruus Emails:
1) Ask the patient to click the "Unsubscribe" link at the bottom of their Kyruus email. This will stop all future Kyruus emails.

